

 filters to choose? Soft, Medium, Hard and Reverse.")
The GND filter (or graduated filter, or Graduated Neutral Density) is a photographic filter that – in combination with the polarising filter and the ND filter – allows for the improvement of lighting during the shooting phase. Thus, improving the dynamic range captured by the sensor. The choice of a graduated filter can be complicated because different transitions exist on the market, and therefore it is necessary to understand how and when to use one to be able to make a coherent choice.
Why buy a GND filter?
A necessary introduction is needed regarding the advantages of using a GND filter. Without further do, let’s investigate the various possible motivations:
- Light is handled before the sensor captures it. This simple, yet formidable characteristic makes it so that the sensor needs to handle a smaller range difference when confronted to a shoot carried out without a GND filter. The result is a lessened risk of clipping the highlights (or of an overly darkened foreground) and thus a better exposed shot. Avoiding clipped highlights (which cannot be recovered in post-production) makes the difference between a successful photo and one that needs to be deleted.
- The number of one-take shots is increased. Burst shots or multiple exposure are certainly techniques one should be comfortable with, and they can be useful in many situations. At the same time, however it is best to maximise the chances of only needing one single shot, because then, on average, you’re going to be getting better results without spending many hours in post-production. Not to mention, if you engage in long exposure, it is definitely best to be able to immediately get your shot.
- There is something hard to quantify when we take a photograph, and that photograph turns out to be as close as possible to the one we set up in our head in the shooting phase. It’s the satisfaction of getting a photograph that post-production can only make better, and it is by only starting from an amazing shot that we can reach a result we can be proud of.
How to position and use a GND filter
Before delving into the differences between transitions and our recommendations, it is fundamental to understand how to position the GND filter.
The logical response would be to position it on the horizon line or, at any rate, on the demarcation line between the foreground/ground level and the sky. This is true, in part, but to be more precise we should say that you should slide it on the filter holder, so that it can be set against the “light line”; i.e., the demarcation between the lighter and darker areas of the picture.
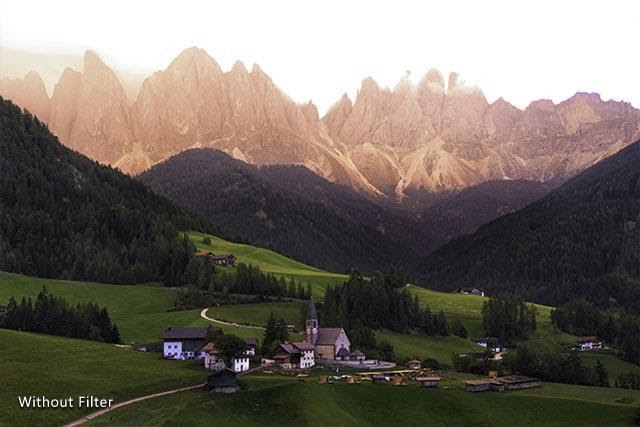
With this definition, we can cover many different situations, even those where a “jagged” horizon might suggest the use of a Soft or Medium filter, but the marked light points to a Hard filter instead. Here is an example:

In this shot by Roberto Sysa Moiola, the demarcation line between ground and sky is jagged due to the mountain peaks, but the light is very marked.
A Hard filter placed diagonally following the light line is ideal, as is the case the simulation you’ll see below.

Another aspect to keep in mind, other than the “light line”, is the direction of the light. The rule of thumb is that one should prefer a harsher transition (Hard and Reverse) when dealing with front light while – when the light comes from the side or the back in relation to the photographer – a Medium or Soft filter can be sufficient. However, let’s see the various filter types in detail.
The difference between Soft, Medium, Hard and Reverse transition
The main characteristic of a GND filter is, indeed, its “gradation”, meaning that a transition between dark and transparent is present, right around the middle of the filter. This transition is more or less marked, to accommodate the various shooting situations, and it leads to the various categorisations of GND filters, which we’ll discuss below.
“Soft” GND filter
The Soft filter was, for a long time, one of the most used filters and, together with the Hard one, the only one available on the market. As the name suggests, it is characterised by a very gradual transition, which definitely makes it the easiest to use.
There are many situations when it can be used, but be careful when the light is too strong, as it might be the case when the Sun is in front of you, or at your side coming in strong and in a marked line. An unwritten but useful rule is that of using a Soft filter that is slightly more intense than others, for example a 3 or 4 Stop.
Our comment
We recommend the 3 or 4 Stop version.

“Medium” GND filter
The graduated filter with “Medium” transition was especially designed by NiSi with the intention of creating a multi-purpose gradation which can be a great starting filter. The transition is, indeed, a middle ground between Soft and Hard, and it makes a varied usage possible. It’s perfect for light coming from the side, or not too intense in general, and it is definitely the most used as a first filter in the 3 Stop gradation.
Our comment
A 3 Stop is recommended as first GND filter.


“Hard” GND filter
The GND “Hard” filter is another best seller because, thanks to the more marked transition among the various graduated filters, it allows for highly precise control over positioning. It is the graduated filter with the most intense effect, so it can already be an interesting tool from 2 Stop already, but the 3 Stop version remains still the most widely utilised. When placed in expert hands, it becomes a jack-of-all-trades filter, because it is definitely the one that allows for contrast to emerge in harsh light difference situations, even when the Sun is coming straight from the front.
Our comment
Recommended with both 2 and 3 Stop.


“Reverse” GND filter
The filter designated with the “Reverse” transition nomenclature is, in fact, a Hard filter as far as the shading at the centre of the filter goes. The substantial difference is at the highest point of the filter, where it gradually fades into transparency. Thanks to this characteristic, even with stronger intensities, like the 4 Stops, it manages to balance the scene well without darkening the outer sides of the image too much (they are always a little dark, due to lenses’ natural vignetting). It is strongly recommended, again, in the 4 Stop version in front-facing Sun situations.
Our comment
Recommended in its 4 Stop version as well to complete the set.

Advice for the choice of a GND filter
Let’s summarise the various recommendations and let’s create a quick buyer’s guide, according to the NiSi UK Team:
- If you have never used a GND filter, as a first-time filter we recommend the 3 Stop Medium (available both in the 100x150mm and 150x170mm versions). Once you use it, you will be able to better comprehend its use, thus making it possible for you to move on to other GND filters that can best complete your set.
- Add a 3 or 4 Stop Soft filter, if you find you handle the Medium one well, and you think you might benefit from a softer transition when handling light in your photographs.
- Add a 3 Stop Hard filter, should you wish for a stronger intensity in the reduction of contrast, or you need to shoot with the Sun in front of you quite often.
- If front-facing light is your cup of tea, and the 3 Stop Medium often is not enough for you, or you already own other GND filters, the 4 Stop Reverse could be the filter missing from your collection.
Obviously, these rules are not set in stone, NiSi’s GND filters range is very wide and there are various, less used filters which might be a good fit for you. Here are some examples of peculiar, but potentially excellent GND filters:
- The 5 Stop Soft: thanks to the very soft shading, even a 5 Stop can become an ideal ally for some shooting styles.
- The 4 Stop Medium: it is actually a widely utilised filter, so we recommend you keep it into consideration if the 3 Stop Medium one is not enough for you.
- The 2 Stop Hard: because of the marked transition, it can be a great choice for those who do not appreciate strong contrasts, but still want to own a graduated filter with this shading.
Using multiple GND filters at a time
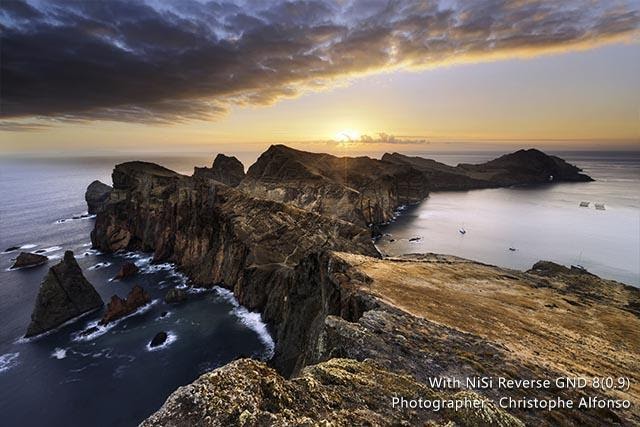
Remember, thanks to NiSi V6 and NiSi S6, if you do not use the ND, you’ll be able to use 3 GND (2 for the NiSi S6) filters at the same time. This way, it is possible to create different combinations and, most of all, to slide in one GND more or less than the other one, to be able to measure and combine the various transitions as you see fit. In this case, having a 2 Stop Soft and/or Medium Filter could be very useful, because they are the best ones to measure together with other GNDs.
For those who love using 2 GND filters together, even without an ND filter, NiSi Switch is the accessory for the 100mm NiSi V6 or V5 PRO Holder that fits your needs. NiSi Switch has two slots, and fits 100×100 ND filters and 100x150mm GND filters. The external slot rotates independently from the rest, this way it is possible to position the two filters with different inclinations.

-
System 100
 NiSi Switch
The NiSi GND filters
The NiSi graduated filters are all made of real optical glass for precise applications (forget all about resin!), they have undergone the Nano Coating treatment and anti-IR for a perfect colour matching. They are available in different sizes for your 100mm or 150mm Holder.


